As we saw when we examined its background and collection modes, db2top is not just a tool for letting you observe a running system – it also lets you record activity for later analysis. Another way to record data for later is the db2top Watch feature, which lets you precisely specify which SQL statements you want to collect. With this feature, for example, you could watch only those SQL statements coming from a particular application or user. In today’s post, we will get to see the flexibility of the db2top Watch feature as we learn how to:
- write watched statements to a file
- use watch with the dynamic SQL screen
- dump the database structure
- set multiple watch entries
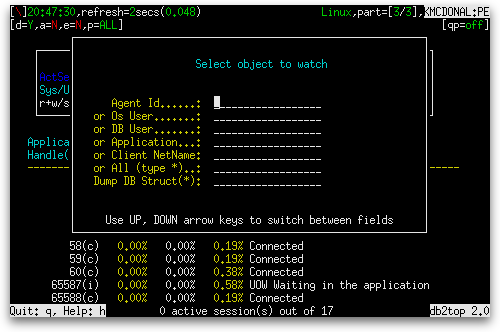
From most screens in db2top, you can turn on the “watching” of SQL statements by holding the Shift key and pressing the ‘W’ key to launch the Watch dialog box. From there, you can choose to watch only those statements issued by a particular application (identified by agent ID or application name), user (identified by operating system user ID or database authorization ID), or client machine (identified by client hostname). You can also choose to watch all statements without any such restrictions. The Watch dialog box is shown below:

Writing Watched Statements to a File
To have the SQL statements you are watching actually get written to a file, you need to be on the Sessions screen. The name of the file they are written to depends on which criteria you specified in the Watch dialog box:
| Criteria specified | File name |
|---|---|
| Agent Id | <Agent ID>.sql |
| Os User | <OS User ID>-<Agent ID>.sql |
| DB User | <DB Authorization ID>-<Agent ID>.sql |
| Application | <Application name>-<Agent ID>.sql |
| Client NetName | <Client hostname>-<Agent ID>.sql |
| All | ALL.sql |
Let’s try an example. From one terminal, open db2top with, say, sample as its -d argument. Press the ‘l’ (lowercase L) key to bring up the Sessions screen.
In another terminal, connect to the database sample.
On the Sessions screen in db2top, you should see the new connection. Hold the Shift key and press the ‘W’ key to bring up the Watch dialog box. Into the Agent Id row, enter the Application Handle of the connection you opened from the other terminal.
Return to the second terminal and issue a query. When the query finishes, look in the directory from which you launched db2top. You should see a file named after the number you entered as the Agent Id with an extension of .sql.
Using Watch with the Dynamic SQL Screen
Another option is to use the Watch feature with the Dynamic SQL screen. If you hold the Shift key and press ‘W’ when on the Dynamic SQL screen, the dynamic cache is written to a file. A message pops up saying “Dynamic cache written to ‘db2adv.sql'”. This file, like the other files dumped by the Watch feature, can be used by the db2advis tool to make recommendations on the design of your database (e.g. what indexes to create) to optimize for the SQL statements collected using the Watch feature.
Dumping Database Structure
The Watch dialog box also offers the ability to use db2top to dump the database structure to a set of files. The files take the form: <database name>-storage.out, <database name>-config.out, and <database name>-schema.out. When you type any character on the line labeled “Dump DB Struct(*):”, a progress indicator of asterisks expands across the Watch dialog box one or more times. When the files have all been written, the message “Database structure dumped, press any key to continue…” is displayed on top of the Watch dialog box. You may recognize these database structure dumps if you have ever used db2look.
Setting Multiple Watch Entries
When you set a watch entry on the Watch dialog box, you can choose to specify any one of the criteria, but no more than one. However, you can specify additional watch entries by relaunching the Watch dialog box and specifying new criteria. So, if you wanted to watch SQL from two applications whose agent IDs are 1 and 2, you would launch the Watch dialog box, enter an agent ID of 1 and press Enter to have it accepted, then relauch the Watch dialog box, enter an agent ID of 2 and press Enter to have it accepted as well.
For other articles on db2top at this site, see the main db2top page.

